Not sure how to structure your Go web application?
My new book guides you through the start-to-finish build of a real world web application in Go — covering topics like how to structure your code, manage dependencies, create dynamic database-driven pages, and how to authenticate and authorize users securely.
Take a look!
For the past couple of years I've used Sublime Text as my primary code editor, along with the GoSublime plugin to provide some extra IDE-like features.
But I've recently swapped GoSublime for a more modular plugin setup and have been really happy with the way it's worked out. Although it took a while to configure, it's resulted in a coding environment that feels clearer to use and more streamlined than before.
I've opted for:
- Tooling integration with the official sublime-build plugin.
- Automatic formatting with the Gofmt plugin and goimports.
- Code linting with the SublimeLinter plugin and gometalinter.
- Autocompletion with the gocode package.
- Code navigation with the GoGuru plugin.
- Snippet management with Sublime Text's inbuilt tool and the PackageResourceViewer plugin.
In this post I'm going to run through the process of setting these up. If you haven't come across these plugins before, I recommend giving them a try!
Prerequisites
To work correctly some of these Sublime Text plugins need an explicit $GOPATH environment variable to be set. And if you're following along, you should also make sure that your workspace's bin directory is on your system path.
Accordingly my bash ~/.profile configuration includes these lines:
...
export GOPATH=/home/alex/Code/go
export PATH=$PATH:$GOPATH/bin
You'll also need to install Package Control, if you haven't already. In the latest version of Sublime Text the easiest way to do that by going to Tools > Install Package Control….
Tooling integration
The official sublime-build plugin provides integrations so you can execute common go commands (like go run, go test and go get) without leaving your editor.
You can install it like so:
- Open the Sublime Text command palette by pressing
Ctrl+Shift+P. - Run the
Package Control: Install Packagecommand. - Type
Golang Buildand hitEnterto install the package.
After installation should see a bunch of new tools in your command palette. Their names are pretty self explanatory:
Build With: GoBuild With: Go - CleanBuild With: Go - InstallBuild With: Go - RunBuild With: Go - TestBuild With: Go - Cross-CompileGo: GetGo: Open Terminal
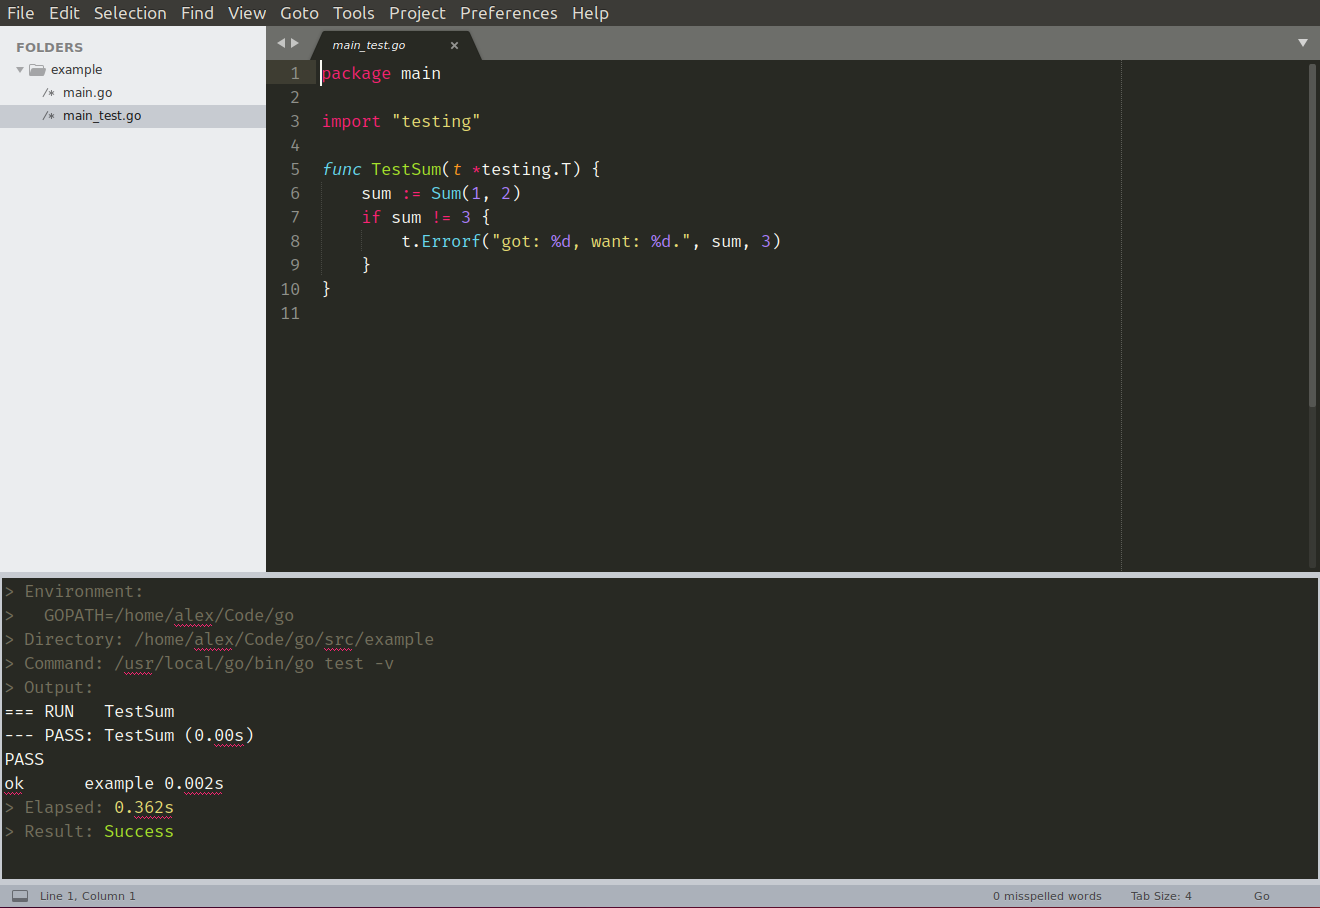
When you run these commands they will open and execute in a panel within Sublime Text. As an example, here's a screenshot of output from the Build With: Go - Test command:
Automatic formatting
For automatic formatting of .go files I've been using the Gofmt plugin. You can install it as follows:
- Open the Sublime Text command palette by pressing
Ctrl+Shift+P. - Run the
Package Control: Install Packagecommand. - Type
Gofmtand hitEnterto install the package.
By default this will run go fmt -s -e on the current file each time it is saved.
I've customised this further to use the goimports tool. If you're not already familiar with goimports, it runs go fmt and fixes your import lines — adding missing packages and removing unreferenced ones as necessary.
To set this up you'll need to install goimports and make sure it's available on your system path:
$ go get golang.org/x/tools/cmd/goimports
$ which goimports
/home/alex/Code/go/bin/goimports
When that's installed, you'll then need to change the Gofmt plugin settings in Sublime Text by opening
Preferences > Package Settings > Gofmt > Settings - User and adding the following configuration settings:
{
  "cmds": [
    ["goimports"]
  ],
  "format_on_save": true
}
(You'll probably need to restart Sublime Text for this to take effect.)
Each time you now save a .go file, you'll find that it gets automatically formatted and the import packages are updated. No more "imported and not used" errors!
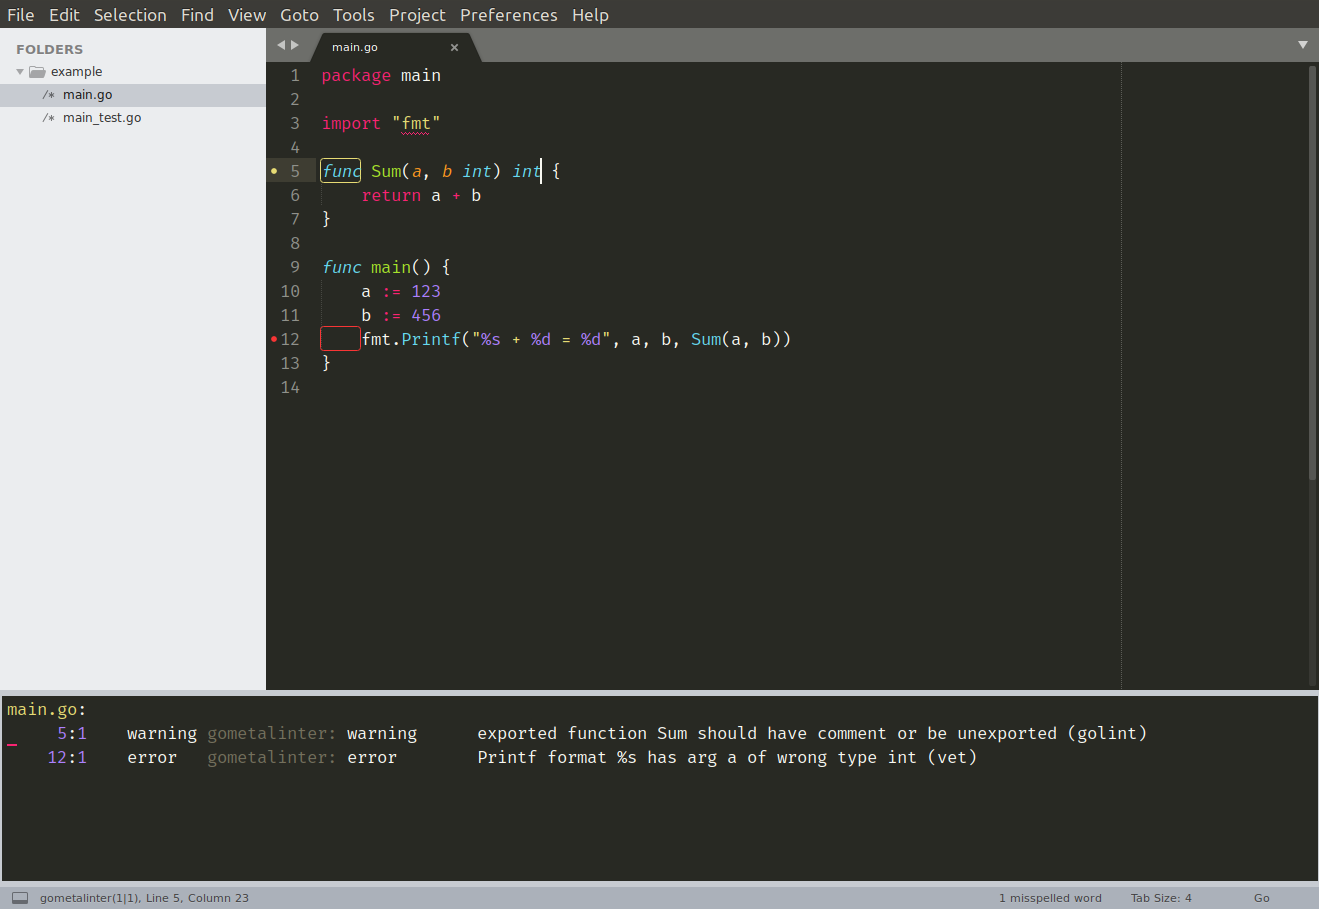
Code linting
For linting of source code I'm using the SublimeLinter plugin. This plugin isn't a linter itself, but provides a framework for running linters and displaying error messages. You can install it like so:
- Open command palette by pressing
Ctrl+Shift+P. - Run the
Package Control: Install Packagecommand. - Type
SublimeLinterand hitEnterto install the package.
The next step is to install an actual linter. I'm using gometalinter, which acts as a wrapper around a bunch of different linters and picks up more potential problems and inefficiencies than using go vet and golint alone. You can install it with the commands:
$ go get github.com/alecthomas/gometalinter
$ which gometalinter
/home/alex/Code/go/bin/gometalinter
$ gometalinter --install
Once that's done, you'll need to install the SublimeLinter-contrib-gometalinter plugin. This acts as the bridge between SublimeLinter and gometalinter.
- Open command palette by pressing
Ctrl+Shift+P. - Run the
Package Control: Install Packagecommand. - Type
SublimeLinter-contrib-gometalinterand hitEnterto install the package.
By default the linter will run in the background as you type, and errors will be shown in the Sublime Text status bar at the bottom of the screen. But I've found suits me more to only lint when saving a file and to display all errors at once in a panel. If you want to do the same, go to Preferences > Package Settings > SublimeLinter > Settings and add the following settings to the SublimeLinter Settings - User file:
{
    "show_panel_on_save": "window",
    "lint_mode": "save",
}
I should mention that the SublimeLinter-contrib-gometalinter plugin only executes the 'fast' linters included in gometalinter. You can see exactly which ones are run by checking the source code.
Autocompletion
For autocompletion I'm using the gocode package, which provides a deamon for code completion. You can install it like so:
$ go get github.com/mdempsky/gocode
$ which gocode
/home/alex/Code/go/bin/gocode
There isn't currently a gocode plugin available via Sublime Text package control (I might add one soon!)… but there is a plugin included in the subl3 directory within the gocode source itself.
You should be able to copy it into your Sublime Text Packages directory with the following command:
$ cp -r $GOPATH/src/github.com/mdempsky/gocode/subl3 ~/.config/sublime-text-3/Packages/gocode
Note: If you're using MacOS then you will probably need to create a new Library/Application\ Support/Sublime\ Text\ 3/Packages/gocode directory and copy the plugin into this.
If you open the command palette and run Package Control: List Packages you should then see a gocode entry in the list.
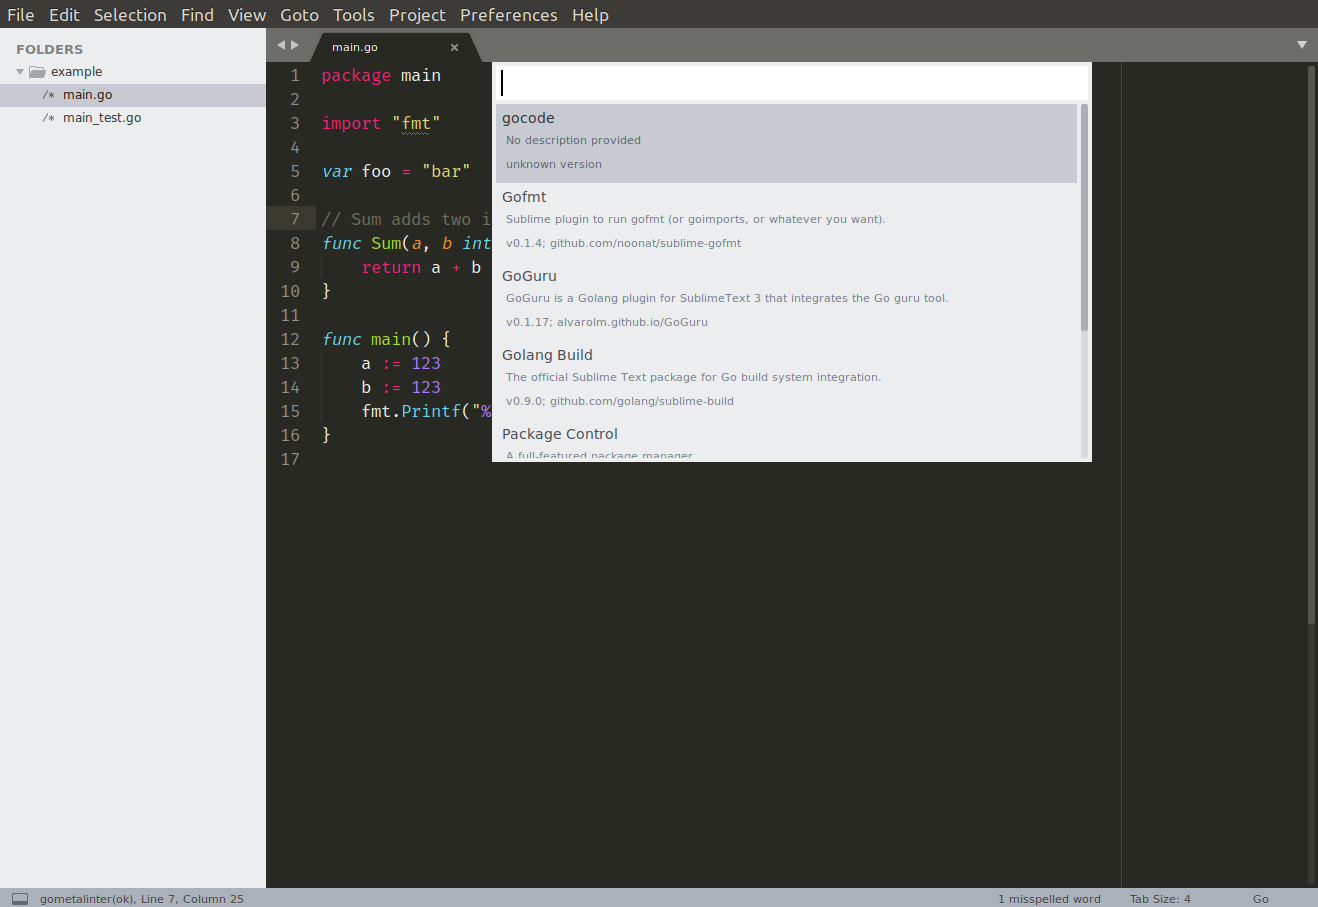
By default Sublime Text will make autocomplete suggestions whenever a letter is pressed. But when working with Go I like also to display potential method names whenever I hit the . character. You can make that happen by going to Preferences > Settings and adding a new trigger in the Preferences.sublime-settings - User file:
{
    ...
    "auto_complete_triggers": [
        {"selector": "text.html", "characters": "<"},
        {"selector": "source.go", "characters": "."}
    ],
}
You'll need to then restart Sublime Text for the settings to take effect. Once you have, you should have autocomplete working nicely and looking something like this:
Code navigation
To help with navigating code I use the guru tool, which you can install with the following command:
$ go get golang.org/x/tools/cmd/guru
$ which guru
/home/alex/Code/go/bin/guru
To integrate this with Sublime Text you'll also need to install the GoGuru plugin like so:
- Open command palette by pressing
Ctrl+Shift+P. - Run the
Package Control: Install Packagecommand. - Type
GoGuruand hitEnterto install the package.
To use the GoGuru tool, first place your cursor over the piece of code you're interested in. Then if you open the command palette and type the GoGuru prefix you'll see a list of available commands, including:
GoGuru: callees– Show possible targets of selected function callGoGuru: callers– Show possible callers of selected functionGoGuru: callstack– Show path from callgraph root to selected functionGoGuru: definition– Show declaration of selected identifierGoGuru: describe– Describe selected syntax: definition, methods, etcGoGuru: freevars– Show free variables of selectionGoGuru: implements– Show 'implements' relation for selected type or methodGoGuru: jump to definition– Open the file at the declaration of selected identifierGoGuru: peers– Show send/receive corresponding to selected channel opGoGuru: pointsto– Show variables the selected pointer may point toGoGuru: referrers– Show all refs to thing denoted by selected identifierGoGuru: what– Show basic information about the selected syntax nodeGoGuru: whicherrs– Show possible values of the selected error variable
You can find a detailed description these commands and their behaviour in this GoogleDoc.
I don't use the GoGuru plugin as often as the others, but when working on a unfamiliar codebase it definitely makes navigating code and building up a mental map of how things work easier. I find the GoGuru: jump to definition and GoGuru: callers commands particularly useful, and easier to use than grepping or running Ctrl+F on the repository.
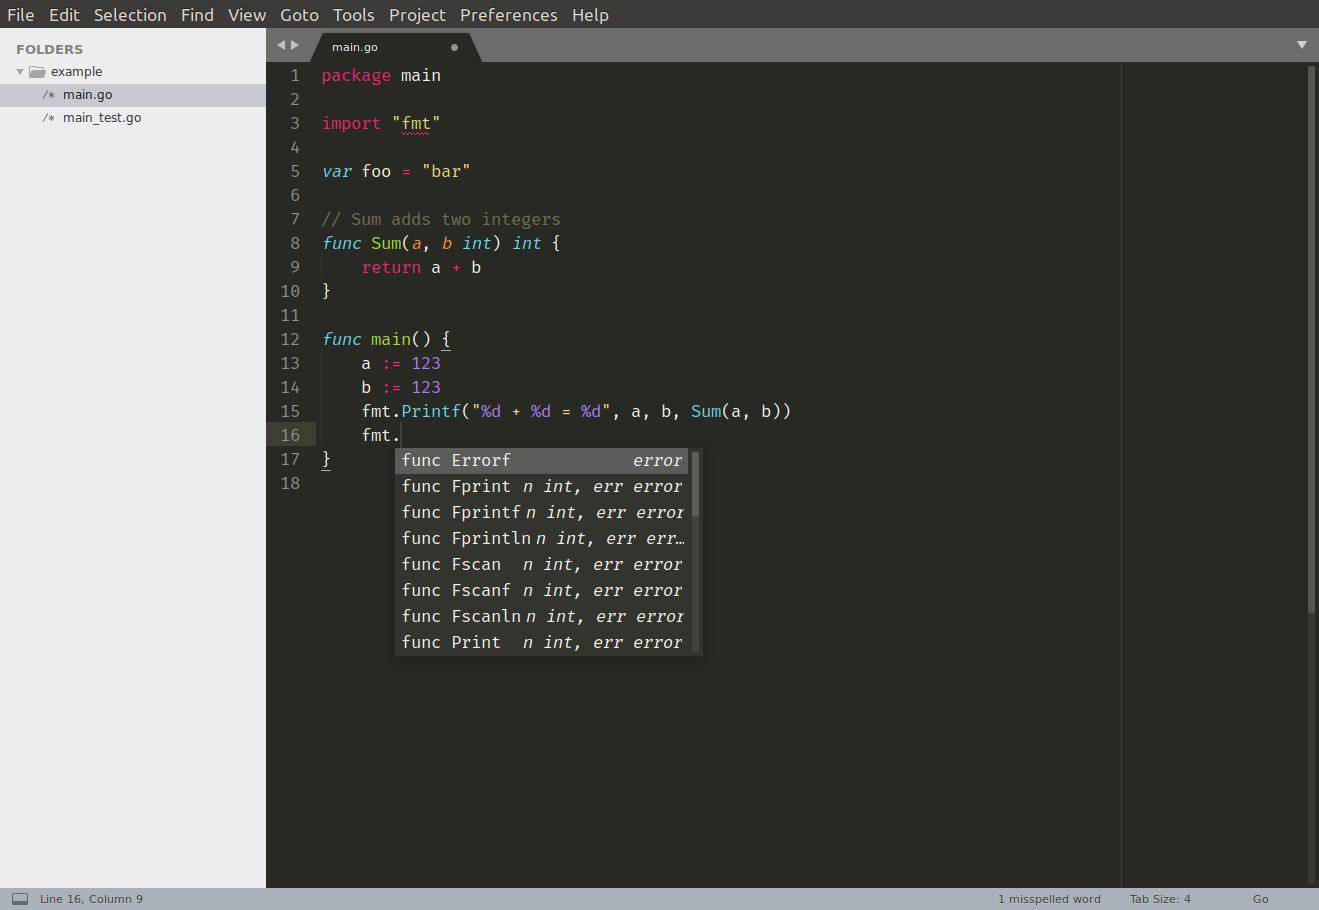
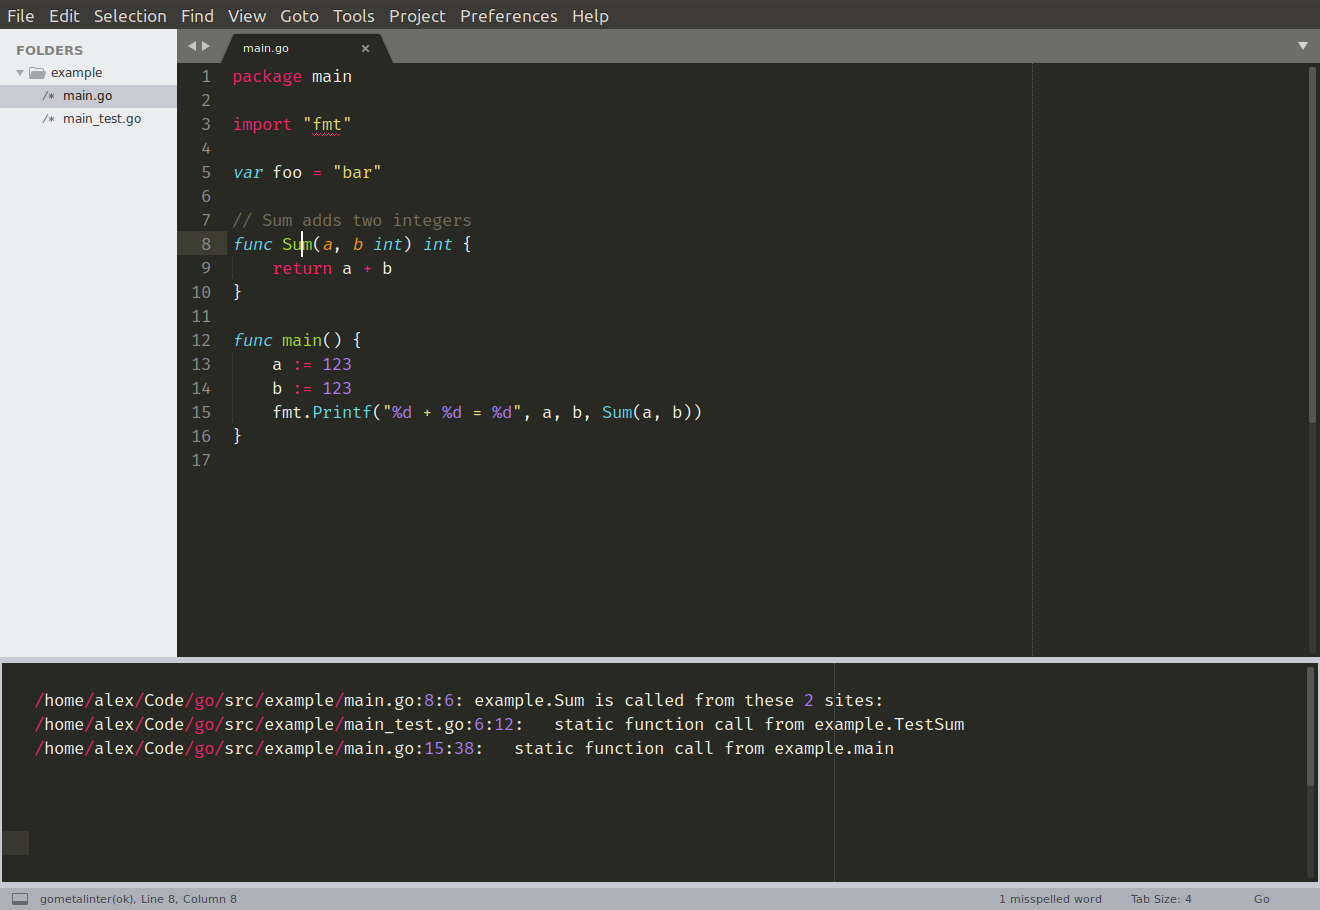
As an illustration, here's a screenshot of running GoGuru: callers on the Sum function:
Snippets
Sublime Text ships with a pretty good workflow for creating and using custom snippets. If you're not already familiar with this Jimmy Zhang has written a great in-depth guide that I recommend reading.
My most frequently-used snippet is probably this one for creating a HTTP handler function:
<snippet>
    <content><![CDATA[
func ${1:name}(w http.ResponseWriter, r *http.Request) {
    ${2:}
}
]]></content>
    <tabTrigger>hf</tabTrigger>
    <scope>source.go</scope>
</snippet>
One thing that bugged me for a while was the built-in snippets for Go that Sublime Text ships with. In particular I didn't like the way that the main() snippet kept triggering whenever I wrote out "package main".
If, like me, you want to edit these built-in snippets the easiest way is probably with the PackageResourceViewer plugin. You can install this as follows:
- Open command palette by pressing
Ctrl+Shift+P. - Run the
Package Control: Install Packagecommand. - Type
PackageResourceViewerand hitEnterto install the package.
Once installed you can open the command palette and run PackageResourceViewer: Open Resource which will list all packages on your system. If you navigate through Go > Snippets/ you should see a list of all the built-in snippets and you can open and edit them as you wish.
Hint: You can also use PackageResourceViewer to edit your own custom snippets without leaving SublimeText. If – for example – your custom snippets are saved under your Packages/User directory, you can open them by running PackageResourceViewer: Open Resource and navigating to the User folder.
If you enjoyed this post...
You might like to check out my other Go tutorials on this site, or if you're after something more structured, my books Let's Go and Let's Go Further cover how to build complete, production-ready, web apps and APIS with Go.